Swap a person
Recast one person in a real shot. What they do, what they say and where they are stay as in the episode; the new person says the same lines, with their lips following the original sound. The standard route redraws the whole shot and uses the model’s pictures directly; nothing is pasted back.
Version 1 (2026-10-15): the same steps as this page, with every download’s link and checksum. sha256 156aa7efcf8c993e91ea29f375715339cfdb67061336c584961201438347a2e8, also in the manifest.
What you need
- A creator invitation and the extension, as for every guide.
- ComfyUI v0.39.0, with the MiniMax H3 models (Set up ComfyUI). This recipe needs
minimax_h3_ref2va_pruned_int8_convrotand theref2v_turbo_4stepLoRA, plus the shared text encoder and VAEs, and SAM 3.1 for the masks. - A 16 GB GPU with 32 GB of system RAM and a pagefile of about 32 GB or more. Close Chrome, OBS, games and other heavy apps while it generates.
- An image model for the new person’s pictures: FLUX.2 or Krea 2 Turbo, or Qwen Image 2.1 locally (our latest test). Seedream 4 or Nano Banana work too, as optional paid services.
- The episode’s subtitles, for the exact words (how).
- Mark and recordGo to step
- Cut each shotGo to step
- The new personGo to step
- Select the personGo to step
- The linesGo to step
- Pick the routeGo to step
- Run full frameGo to step
- CheckGo to step
- DeliverGo to step
The whole flow in one picture
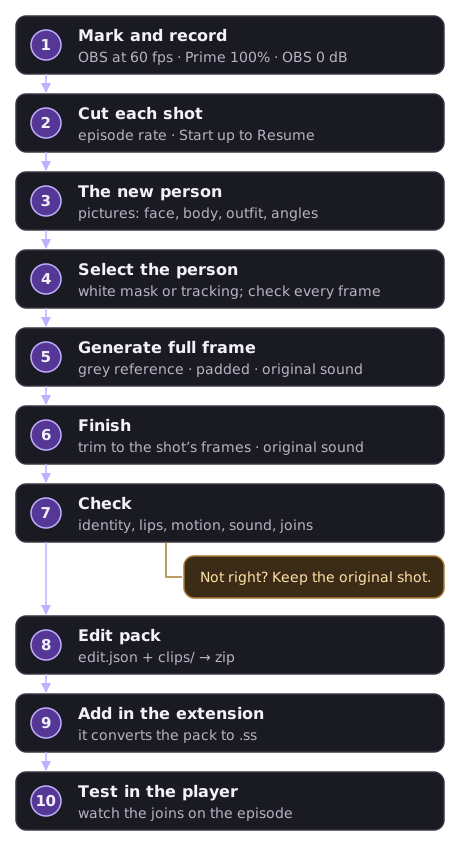
1. Mark and record
As in Capture and mark your shot:
- Only the shots with the person you recast, picked by eye (why). Leave every other shot as it is.
- Keep shots with on-screen text original (credits, captions, signs burned into the picture), or start your segment after the credits. A full redraw rewrites the text as garbled names.
- Watch each one from start to end: one stretch can hide several quick cuts. Split at every cut; a part must never cross a cut.
- Start is the first frame you replace; Resume is the first frame you don’t (normally the next shot’s first frame). Your shot is every frame from Start up to, but not including, Resume. Two shots back to back share one boundary: the first shot’s Resume is the second shot’s Start, so no frame is used twice or skipped (picture).
- Set the markers, then capture the stills, and check the times the extension shows. Taking a new still doesn’t move a marker you already set.
- Record with OBS at 60 fps (Display Capture), Prime’s volume at 100% and OBS’s Desktop Audio at 0.0 dB (how). Keep the recording: you cut every shot from it.
- A long shot is split into balanced parts of about 9 s inside the shot (parts). A shot seen from behind: keep the original (in our tests the model turned the person to face the camera).
- Size: 1024 × 576 for 16:9 (the default download), 768 × 576 for 4:3 (crop, never squeeze); 704 × 544 for a standard-definition 4:3 source. A 4:3 picture inside a 16:9 recording: crop to the 4:3 picture and use the 4:3 size; 1024 × 576 doesn’t apply.
- Your clip needs a sound track: the workflow copies it (add a silent one only if it has none, and then there’s nothing for the lips to follow).
2. Cut each shot
Cut each shot from the recording at the episode’s frame rate (23.976 for most US shows), from Start up to the frame before Resume, with its sound (how).
Write down each shot’s frame count: it is the length you deliver, whatever the model generates.
If a shot crosses a camera cut, split it there and generate each side on its own. You can join them back into one clip when you deliver.
3. Make the new person (two pictures)
- Picture 1: a face close-up of the new person, made with FLUX.2, Krea 2 Turbo or Qwen Image 2.1. Use the head angle of your shot and a neutral expression: your shot supplies the expressions, and a smiling front-on portrait pulls the face toward the camera.
- Picture 2: the same person, full body, in the outfit they’ll wear in the shot, edited from Picture 1 so the face stays identical. The order matters: face first, then body.
- The outfit from your shot: crop the costume from a still of the episode without the actor’s face, and edit Picture 2 so the new person wears it. The face comes only from Picture 1.
- Angle views: if the person is seen in profile, make a profile Picture 1 as well. The body picture’s pose pulls too: a front-facing body picture can turn a profile shot toward the camera.
- Plain grey backgrounds. The pictures must not bring their own room, light or wind.
- Describe what isn’t there: in our tests a headband appeared that nobody asked for; leave accessories out of the pictures unless you want them.
- A non-human character (a robot, an alien): Picture 1 is the character placed into a still of your shot instead of a face close-up. Make it with an image-model edit of the still (“replace the man in the uniform with …, same pose, same light, everything else unchanged”). Picture 2 is a clean picture of it on grey.
How the test made the pictures (generalized): Picture 1 from “A real photograph of a fictional {AGE, HAIR, SKIN, EYES, EYEBROWS, MARKS}, head and shoulders, three-quarter view, neutral expression, plain light grey background, soft even light, realistic skin texture”; Picture 2 by editing it: “The same person from the reference image, identical face and hair, now full body wearing {CLOTHES}, plain light grey background”. Our latest test used Qwen Image 2.1 locally for the outfit and profile edits.
4. Select the person you recast (for the grey reference)
The workflow greys this person out in the reference video only, so the model doesn’t copy the original face. The result is a full new generation: nothing is pasted back onto your shot.
Two different masks:
- the white mask from the people masks or tracking workflow marks the person;
- the swap workflow turns it into the grey reference itself (it fills those pixels with flat grey).
You never paint grey yourself.
Download the people masks workflow (one person)
| Node | Set it to |
|---|---|
| Source shot | Your shot |
| Person or thing | Words that pick out only the person you recast, as they look in the original (woman with dark curly hair) |
- If you use a version with more word slots (
-2,-3,-6): Fill every word slot: if you have fewer words than slots, repeat your first word in the spare slots. A blank slot marks the whole person. - Run it, and keep
people8.mp4(the person, grown 8). - Step through every frame, not a few previews: the person you recast is white on every frame where they show, and nobody else is. In one test, 8 evenly spaced previews missed a mask that jumped to another person for two frames. Words are a hint, not recognition: a word mask can pick up someone else when your person enters, turns, or is covered by someone walking past. If it does, use tracking (below) instead of more words.
- Grey only clean, solid shapes. If the mask breaks into small scattered pieces (a color mask catching a fading glow, say), the model draws those grey patches as pale shapes: in one test they showed on an actor’s chest. Drop tiny fragments, including small separate islands on other people (a stray island on someone else’s hand left a grey patch there), and end the mask on the frames where the element is gone. With that, a second try had no pale patches, rims or flicker.
Track one person
Download the track one person workflow
Built-in nodes only. Validation pending: this download hasn’t had its GPU check on our side yet; step through its preview before you use the mask.
- Load your shot in Your shot. On the first frame, set the Box round the person node (x, y, width, height in your shot’s own pixels) round the one person you recast, and run it. It finds that person and follows them through the shot.
- Keep
tracked8.mp4(the person, grown by 8) and use it in place ofpeople8.mp4.tracked-preview.mp4paints the person red over your shot. - Step through it: frames where the person is fully hidden can be empty. Someone passing in front must stay black.
If the person walks in partway through, they aren’t in the first frame to box. Track the shot backward by hand: reverse your shot with FFmpeg (ffmpeg -i source_shot.mp4 -vf reverse -af areverse source_shot_reversed.mp4), run the workflow on the reversed copy with the box on its first frame (your shot’s last frame), then reverse tracked8.mp4 the same way (ffmpeg -i tracked8.mp4 -vf reverse tracked8_forward.mp4) so the mask is back in the normal order. Step through the result as above. A one-step reverse download comes later.
In our test, tracking fixed two shots where words picked the wrong people: an entry, tracked backward, and a passer-by in the foreground, tracked forward. If tracking can’t hold the person either, use a box over their area (box mask, under Check).
5. Get the lines and their timing
- The words come from the episode’s subtitles (an English SRT), lined up with the episode (how). No subtitle file? Download an SRT for your episode. They’re easy to find for almost every show.
- The timing comes from your shot’s own sound: when each line starts and ends, in seconds from the start of the shot.
- Subtitle times are not lip timing: measure each line in your shot’s own sound.
- Who speaks: a line said by someone off screen stays off screen; mark it so in the prompt.
6. Pick the route
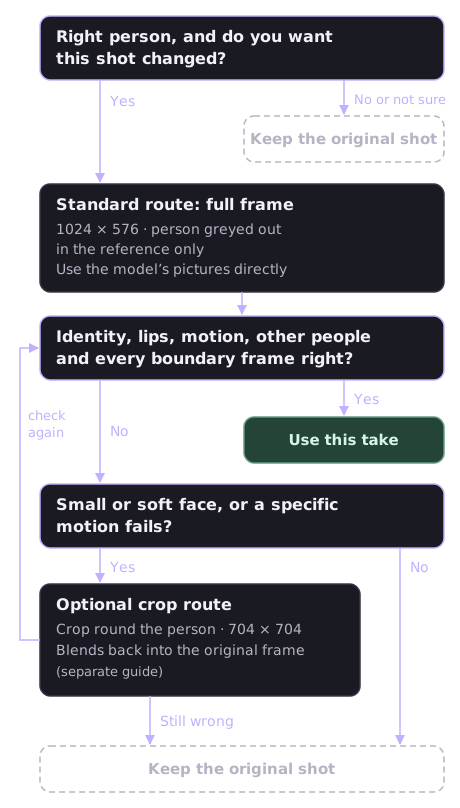
- Is it the right person, and do you want this shot changed? If you’re not sure, keep the original.
- Standard route (most shots): full frame. The model redraws the whole shot at 1024 × 576, and you use its pictures directly. A second person in the shot is not a reason to crop: name them in the prompt and check their face.
- The crop route, only when the full-frame result fails: the face gets too few pixels (a small or distant face comes out soft or wrong), or a specific motion fails. It crops round the person from the full-size picture, generates at 704 × 704, and blends the result back into the original frame. It needs extra nodes, and its guide comes later.
- If neither gives an acceptable take, keep the original shot.
7. Run full frame
Download the swap workflow (16:9) 4:3
Open it with File → Open in ComfyUI, or drag it onto the canvas. Built-in nodes only. Validation pending: this version pads the reference, takes your shot’s sound and frame rate, and carries the prompt template; its GPU check on our side is still to come.
| Node | Input | Set it to |
|---|---|---|
137 LoadImage | Picture 1 | The face close-up |
139 LoadImage | Picture 2 | The full-body picture |
150 LoadVideo | file | Your shot, with its sound. The sound goes into the reference and straight into the output |
| Mask video of the person to replace (white = grey them out in the reference; same length as the source shot) | file | people8.mp4 or tracked8.mp4 from step 4 |
136 MiniMaxH3ReferenceToVideo | prompt | The template below, filled in |
136 | width, height | 1024 × 576 (16:9) or 768 × 576 (4:3); 704 × 544 for a standard-definition 4:3 source (see Run it) |
136 | length | Set by the workflow. It pads the reference to the model’s grid and generates at least 124 frames (see Three counts, below). Leave it |
130 CreateVideo | fps | Set by the workflow from your shot’s own frame rate. Leave it |
129 RandomNoise | noise_seed | A new number for each take |
- Inside the graph: the mask is binarized and the person filled with flat grey (“Reference with the element greyed out”), and that copy goes in as the reference video. The sound and the audio anchor stay your shot’s own. The padded tail is reference only. The sound is never stretched.
- In our test: two real-episode shots that hadn’t recast before recast fully, consistent across shots. The other actor was untouched and the mouth moved with the lines. One recast came out lit brighter than the dark scene: describe the scene’s light in
<Subject 2>anddetailed_description(“dim firelight from the left, deep shadows”). In our latest test, four of six shots (close-ups and medium shots, one with a passer-by in front) used this route directly.
Three counts
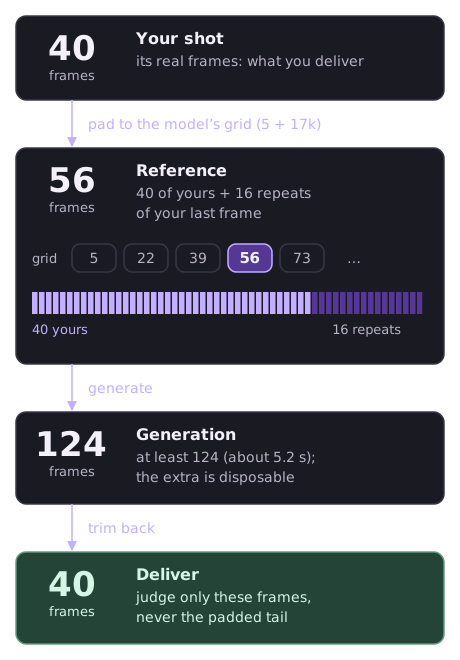
- Your shot: its real frames, for example 40. This is what you deliver.
- The reference: the model reads reference videos only in lengths of 5, 22, 39, 56 … (5 + 17k) frames and drops any extra. The workflow repeats your last frame to the next length up (40 → 56), so none of your shot is lost.
- The generation: at least 124 frames (about 5.2 s), or the padded reference if that is longer.
The extra frames are disposable: you trim back to your shot’s count when you finish. Judge only those frames, never the padded tail.
Leave the rest: 4 steps, res_multistep / simple, denoise 1, LoRA strength 1.
Replace every {…} before you run: ComfyUI drops the braces when it queues the prompt, so a leftover placeholder goes in as plain words.
Prompt template
subject_definitions:
<Subject 1> is the {WOMAN/MAN} shown in <Picture 1> and <Picture 2>: {AGE, HAIR, SKIN, EYES, EYEBROWS, DISTINCTIVE MARKS}, wearing {CLOTHES}; {WHAT ISN'T THERE, e.g. "no headwear"}.
<Subject 2> is the {PLACE} from <Video 1>, with the source's light: {ONLY WHAT IS VISIBLE IN THIS SHOT; THE LIGHT'S DIRECTION AND HOW DIM}.
<Subject 3> is {EACH PERSON WHO STAYS, BY POSITION, HAIR AND CLOTHES}, exactly as in the source.
<Video 1> is the source shot to edit; the person to recast is hidden under a flat grey shape, and <Subject 1> stands exactly where that shape is, with its posture and movement. Recast only {WHO} as <Subject 1>.
<Audio 1> is the synchronized original soundtrack of <Video 1>, including the exact spoken words, pauses, breaths and room tone.

summary:
[video editing + reference generation + audio reuse] The target video is an edited version of <Video 1>. Replace only {WHO}'s visible identity with <Subject 1>, retaining the original framing, lighting, camera movement, performance and the precise timing of every word.

retention_analysis:
<Subject 1>: fully_preserved identity from the pictures: {face, hair, outfit}, adapted to the source's {LIGHTING}.
<Subject 2>: fully_preserved scene geometry, practical lights, exposure and camera.
<Subject 3>: fully_preserved face, hair, clothes and motion from the source.
<Video 1>: partially_preserved; retain the {head and shoulder movement, glances, gestures} and timing; replace only {WHO}'s appearance. Its lips and jaw follow the original waveform.
<Audio 1>: fully_copy the complete original soundtrack one-to-one with identical word timing, pauses and ambience.

detailed_description:
Realistic {YEAR} live-action television footage, lit by {THE SOURCE'S LIGHT IN PERIOD TERMS, e.g. "dim firelight from the left, deep shadows"}, matching the source exposure throughout.
[Shot 1] <Subject 1> {framing, pose, mood}; {SPEAKING OR SILENT; EXPRESSION; WHAT COVERS THE FACE, IF ANYTHING}. From {T1} to {T2} seconds <Subject 1> (S1), in the source speaker's {voice description}, says <d>[English]{EXACT LINE 1}</d> Its lips and jaw follow the original waveform. From {T3} to {T4} seconds {SPEAKER}, off screen, says <d>[English]{EXACT LINE 2}</d>
The source has {N} frames. After them, hold the last pose until the end of the clip; those frames are discarded.

overall_soundscape:
Copy the original room tone, breathing and words exactly from <Audio 1>.

non_diegetic_music:
{N/A if the shot has no music; otherwise: Copy the music already in <Audio 1>.}
subject_definitions:<Subject 1>the new person as in Pictures 1 and 2;<Subject 2>the scene, with the source’s light, only what’s actually in this shot. Write it per shot, not once for the scene: “a wooden table with fruit” invented a fruit bowl, and “a wash tub” from one shot put a basin into another shot where none is visible; each person who stays, “exactly as in the source”.<Video 1>: “the source shot to edit; the person to recast is hidden under a flat grey shape, and <Subject 1> stands exactly where that shape is, with its posture and movement”.detailed_description: whether the person speaks or is silent, their expression and anything that covers the face; each line in<d>[English]{EXACT LINE}</d>with “From {T1} to {T2} seconds …”, plus the mouth rule (“Its lips and jaw follow the original waveform.”). End with the padding line: “The source has {N} frames. After them, hold the last pose until the end of the clip; those frames are discarded.”non_diegetic_music: “N/A” if the shot has no music; otherwise “Copy the music already in <Audio 1>.”- Describe the new person in full in
<Subject 1>: age, hair, skin, eyes, eyebrows, marks and the outfit, and what isn’t there (“no headwear”). - Name each person who stays as a subject, “exactly as in the source”. Never write “no people”.
- Describe the source voice (“in the source speaker’s calm, lightly amused voice”), not a new one: the sound is copied.
- Night or dark shots: a recast face can come out far brighter than a dark source (about 6× in our night test). Add the light to the prompt: “Lit only by dim night light from the side, most of {SUBJECT}’s face in shadow, as dark as the rest of the scene”, and “a low-key, dark {PLACE} at night” in the scene sentence. That roughly halved the excess (to about 3×), kept the same person and gave real side shadow.
Run it: about 3¼ minutes per 124-frame shot at 704 × 544 on a 16 GB card; longer shots take roughly 3 seconds per frame. Shots of 175 frames or more use almost all of 32 GB RAM. Close other apps (game launchers, browsers) before you run it, or ComfyUI can be killed partway through. For standard-definition 4:3 sources, render at 704 × 544: it stays closest to the source and is fastest. 832 × 640 is slightly sharper (eyes, freckles) for about 10% more time. Avoid 1024 × 768 for SD: it takes about 40% longer and invents detail that drifts from the source (in our test the clothing changed color). Size didn’t change who the new person is, or the lip sync.
Finish
Finish with the finish workflow (seamless-finish.json; Finish and conform): it keeps your shot’s exact frame count, plays every frame 1:1 at your episode’s rate, scales to the Start still and puts your shot’s original sound back. Use the model’s pictures as they are: no paste-back, alignment or color matching.
If you split one long shot into parts: join them in order and drop each later part’s first frame (the one-frame overlap). Separate shots meet at a cut and share no frame: drop nothing.
1.1 Change what someone wears
The same workflow (the blank-reference swap file), but you grey out the garment, not the person. The actor’s face, hair, gestures, props and voice stay visible in the reference, so they stay theirs.
- Pictures 1 and 2: the new garment, front and side, on plain grey (a dress form or a flat picture), with the color, material and details you want.
- An open garment (a jacket over a waistcoat or a shirt): picture and mask what shows in the gap as one matching set (“a dark green jacket and waistcoat”). A jacket alone let the layer underneath flicker in our tests.
- The mask (step 4), in three steps. Garment words spilled onto other people in every outfit test, so always keep the garment mask on the wearer:
- Mark the garment with words in the people masks workflow: the garment and the arms (“white t-shirt”, “arms”; for an open garment, what shows in the gap too, such as “waistcoat”). Keep its
people8.mp4, grown 8 (or 24 if the new outfit covers more than the old one; see below). Fill every word slot: if you have fewer words than slots, repeat your first word in the spare slots. A blank slot marks the whole person. In one test, 4 words and 2 blank slots greyed the wearer’s whole body, head included, and the render recast the face. - Mark the wearer with the one-person version of the people masks workflow, and keep its
people.mp4. - Keep only what falls on the wearer with the keep on a person workflow (
seamless-mask-keep-on-person.json). Load the garment mask (people8.mp4) in Mask video of what to grey out (from the mask workflow) and the wearer’speople.mp4in Mask video of the wearer (from the people masks), and leave Grow the wearer (px) at 12. Load its Mask video, only on the wearer in place ofpeople8.mp4in the swap. (The two inputs are trimmed to the shorter one.)
Used in both outfit tests, where it removed every spill onto the other person. On 5 shots of the first, the jacket was right on every shot, the neck looked natural, the other person was untouched, and there were fewer edge flags than with the earlier helper mask.
- Mark the garment with words in the people masks workflow: the garment and the arms (“white t-shirt”, “arms”; for an open garment, what shows in the gap too, such as “waistcoat”). Keep its
- Grey out where the new outfit will be, not just the old one. Garment words find the old garment, so the mask has the old garment’s shape. Check the mask preview: the whole old garment should be white on every frame; if only part of it is, try other words for it (color + type, the garment’s parts, “arms”). In our tests “white t-shirt” + “arms” covered a t-shirt fully, and a new open jacket that covered no more than the t-shirt worked with those words alone. A tighter mask is fine, as long as the whole garment is covered: in another test the mask kept the neck clear and still worked.
- If the new outfit covers much more than the old one (a higher neckline, longer sleeves), no garment word can mark that extra area: in our test, 25 word combinations for a low-necked blouse being replaced by a high, round-necked tunic all fell short. Add “torso” alongside the garment words; step 3 keeps it on the wearer. In our test it helped close-ups the most (one went from 0.42 to 0.79 of the needed area), with nothing on the face; the best set was “torso”, “top”, “dress”, “clothes”. Don’t use “upper body”: it takes in the head, and a third or more of the mask landed on the face. “Chest” did less than “torso”. Even with “torso”, the mask may not reach the full new neckline (about 0.6 of it overall in our test, against nearly all of it when the new garment covers the same area as the old). Check the preview, and grow that mask (step 1) to 24 (up to 32 at most). Growing closes most of the neckline gap: overlap with the full new-outfit area rose from 0.62 at Grow 8 to 0.72 at 24 and 0.74 at 32. Spill onto the face stayed near zero up to 24 and was starting to climb at 32. Beyond that, keep the original for shots where the gap shows (render-checked on a close-up: on a par with the helper version). Fill every word slot here too, for example “torso”, “top”, “dress”, “clothes”, “torso”, “torso”: the same close-up with 2 blank slots greyed the whole body and recast the face.
- Close-ups: keep the face, neck and hair out of the mask, so the face stays in the reference. Grey only the garment (and the body below its neckline) on the wearer.
- If the wearer’s own mask drops out or jumps on some frames (step 2), use the keep inside a box workflow (
seamless-mask-keep-inside-box.json) with a box drawn close round the wearer instead of step 3. Steady shots only: the box doesn’t move. (It matched the tested mask exactly on all 106 frames.)- Load the garment mask in Word mask video (white = the garment; from the mask workflow).
- Set Box left (px), Box top (px), Box width (px) and Box height (px) close round the wearer (on a close-up, the box’s top at the neckline), and Box from frame / Box until frame (0 = to the end).
- It keeps only the part of the mask inside the box, and saves Mask video, only inside the box (white = grey out in the reference). Load that in place of
people8.mp4in the swap.
- Prompt:
<Subject 1>is the same person “exactly as in the source: same face, hair and voice”, “now wearing {THE NEW GARMENT}, as in <Picture 1> and <Picture 2>”. Everyone else is “exactly as in the source”. Timed lines aren’t needed: the face stays visible in the reference, so the mouth follows the source. - In our test: the new jacket with belt and buckle; the actor’s face, beard, gestures and props kept; the mouth following the source; the other person untouched; no paste edge.
- Check: the face and hair are still theirs, and nobody else’s clothes changed.
8. Check
- Judge only your shot’s real frames, never the padded tail.
- A finished run is not an approved take: the model reports success even when it recast the wrong person or kept the old face.
- Review every take for: seams and edges (where a crop or the grey area met the picture), identity (the same new person in every shot), mouth timing, accessories nobody asked for (in one review, a hair bow appeared) and occlusion (hands, hair or someone passing in front). If the result is a different person, keep the original shot.
- Look at every face in the result. The automatic check compares with your source, and can pass a recast face that moves the same way.
- Faces, by eye: step through the result next to your source. The new person looks the same in every shot: put the shots side by side, especially any made with a box mask; everyone else is still themselves (no face drifted to a look-alike), nobody added or missing.
- Lips: at normal speed, the mouth moves with the words.
- The mask covers the thing on every frame of the shot. Where it finds nothing on some frames, those frames keep the old one in the reference, and it pops from old to new mid-shot (in an outfit test, the sleeves stayed old). Step through the mask before you run.
- The mask follows the right person on every frame (step 4). When the person covers her face (a hand, turning away), a word mask can jump to another person; her real face then reaches the model, and that shot doesn’t recast. Try tracking first. If it still jumps, cover that person’s area with a box instead, still greyed in the reference only:
- The box mask workflow (
seamless-box-mask.json). Load your shot in Source shot (the mask matches its length and size). - Set Box left (px), Box top (px), Box width (px) and Box height (px) round where the person is; and Box from frame / Box until frame (0 = to the end) for the frames where the word mask jumps (or the whole shot).
- Load its Box mask video (white = grey out in the reference) in step 7’s mask input, in place of
people8.mp4. - Keep the box close to the person’s shape, with a modest margin for their movement in those frames, and keep it off anyone else. Never a full-height or near-half-frame block: in our test a box that tall came out as a flat grey panel in the result, with only a small face late in the shot.
- A box-mask shot can come out with a slightly different face: compare it with the other shots (below). Don’t describe what’s under the box: in our test an oil lamp appeared in a greyed area.
- The box mask workflow (
- The flicker check (how): red on faces or scenery is a problem.
- Sound: the clip is as loud as the episode either side, with no click at either join.
- Then Preview clip… on the episode, and build the edit.
Easy to confuse
- A finished model run is not an approved take: check identity and performance yourself.
- The white mask you check is not the grey reference, and in the crop route neither is the soft mask that blends the result back.
- Taking a new still doesn’t move a marker you already set.
- The minimum clip length is not the shortest real shot, and not the model’s length.
- A ComfyUI version that worked for us is not a tested minimum version.
- A good head swap in the crop route doesn’t show that whole-body changes work.
- A file that passes the checks hasn’t been tested in the player: watch it on the episode.
9. Deliver
- Put the finished clips in an edit pack:
edit.jsonplus aclips/folder, zipped. The extension turns it into a.ssfile when you add it. Renaming another zip to.ssdoesn’t make it one. - Shots next to each other can go in one clip: join them with the original frames between and one continuous stretch of the original sound.
- A shot shorter than the minimum clip length (1.5 s for a local edit with extension 0.64.3 or later; 5 s to submit to the catalog): extend the clip with untouched original frames from the next (or previous) shot. Never add a held or generated frame. In our test, a 1.29 s shot became a 1.54 s clip with six original frames after its cut.
Batch mode: every shot of one character
Batch mode is the same Production v4 swap, run for each shot in a cast-selection.json from Find every shot of a character. Only the inputs change: Start and Resume, the person box and the pictures come from that file instead of being gathered by hand. Every human checkpoint stays.
- The file lists each shot as [Start, Resume) frames of the analysed source, one person box as the tracking anchor, and whether the shot is selected. Before a run, add your Pictures 1 and 2 to its
replacement.reference_images. Check it with the cast-selection checker. - The runner (
run-swap-batch.py):- reads the selection and refuses a file with errors, a capture clock or an unverified frame cadence;
- cuts each selected shot from the source at its exact frames, with its sound;
- tracks the person from the box (forward, backward for an entry, or both ways from an interior frame);
- runs the same full-frame workflow as step 7 through your local ComfyUI’s API, one camera shot at a time;
- stops at each human review gate, the mask and then every take, and waits: it never approves anything itself;
- adds delivery context to a short shot or group: the minimal N = ceil(1.5 × fps) frames in total (36 at 23.976), taking untouched original frames after Resume first, then before Start. Context never goes into the model, and generation never crosses a cut;
- writes the finished clips and an
edit.jsonready for the edit pack.
The batch runner is coming soon. Until it ships, swap each selected shot with steps 1–9 above, taking Start, Resume and the box from the selection file.
When it doesn’t work
| You see | Fix |
|---|---|
| The outfit (or the person) switches from old to new mid-shot | Check the mask preview first: if it found nothing on some frames, those frames kept the old one. Step through it; every frame must cover the whole garment (or the person). Use more words, or keep the shot original. If the mask already covers everything on every frame, see the next row |
| Part of the outfit pops between old and new where hands cross the garment (hands over the chest or mouth) | The mask breaks around the hands, whatever the words: check those frames, and keep the original if the outfit pops |
| The shot starts in the old outfit, then changes (the old color for the first 1–2 seconds, often on a long close-up) | The mask is fine (check it from frame 0): the model starts from the old garment. More mask words or a box won’t fix it. Add a line: “From the very first frame {SUBJECT} already wears {THE NEW GARMENT}; there is never a {THE OLD GARMENT} at any moment of the shot.” A new seed alone doesn’t fix it (in our test: the old color on 57 of 218 frames, 53 with a new seed, 0 with the line). If it persists, keep the original shot. (The same start-of-shot behavior as a person missing at the start in Rebuild a shot with actors. The line works when the place stays the same (an outfit); when you’re changing the place, it pulls the old place back.) |
| Garbled names or text on screen | A full redraw rewrites burned-in text: keep shots with credits or captions original, or start after the credits |
| Pale patches where the grey was (on an actor, or the set) | The grey mask was broken into small pieces, or carried on after the element had gone: grey only clean, solid shapes; drop tiny fragments; end the mask when the element is gone |
| The person was seen from behind and now faces the camera | Keep the original for that shot |
| An accessory appeared (a headband, a scarf) | Leave it out of the pictures; say “no headwear” in <Subject 1>; a new seed |
| The lips don’t follow the words | Check the line text and timing in the prompt (measured in your shot’s sound, not taken from the subtitles), and that your shot has its sound; a new seed |
| Someone else changed face | Name them as a subject “exactly as in the source”; give them their own picture in the version with an extra picture input (h3-ref2va-character-swap-extra-ref.16gb.json) |
| The original actor still shows | The mask missed them on some frames, or jumped to another person where they cover their face: step through people8.mp4, use tracking or more exact words, or use the box mask workflow over their area (Check), and run again |
| The mask jumps to someone else when your person enters or is covered | Words aren’t recognition: use the track one person workflow from a clear frame (backward for an entry) |
| The face in a wide shot comes out soft or wrong | The face has too few pixels at full frame. The crop route (its guide comes later) can help; until then, keep the original |
| The clip is quieter than the episode | Prime or OBS was turned down when you recorded. Record again at 100% and 0 dB. Don’t normalize to a fixed loudness |
| The recast person is lit brighter than the scene | Describe the scene’s light in the prompt (direction, how dim) |
| Someone else came out with a different face | They were white in the mask too: use words that pick out only the person you recast, or tracking |
| The recast person drifts back toward the original | Stronger pictures (the face close-up at your shot’s head angle); a new seed |
| The new hair or head shape didn’t take (short hair stayed though the pictures show a shaved head) | The grey outline keeps the old silhouette, so a very different head or hair shape may not follow the pictures. A known limit |
| A grey patch on someone else (a hand, a shoulder) | A small separate piece of the mask landed on them: remove small islands from the mask before you run |
| Something appears that isn’t in the shot (a fruit bowl, a basin, an oil lamp) | The scene description named it, or named something from another shot: write the scene line per shot, with only what’s visible in that shot |
| Part of the old outfit is still there | The mask covered only part of the garment (one word found only the sleeves): try other words (color + type, the parts, “arms”) until the whole garment is white in the mask preview. If the new outfit covers much more than the old one, add “torso” (not “upper body”: it takes in the face) and keep it on the wearer |
| A box-mask shot has a slightly different face | Compare it with the other shots; a new seed, or a tighter box. It can stay slightly different (a known limit) |
| A flat grey panel appears in the result | The box or grey area is too big: tighten it to the person, with a modest margin |
| A join between parts of one shot jumps | Cut the parts at a natural pause; keep the one-frame overlap and drop the duplicate |